*Disclaimer – This is not intended to be a guide for the installation of any electrical equipment. This is nothing more than a written log of what we have personally done in our own motorhome. We accept no responsibility for any events that may transpire from the copying or replication of the diagram described below*
In order to facilitate the use of 230v equipment in our new home, Ellie the Elddis, we decided to install a 1500w inverter circuit into the existing leisure system of our motorhome. Since this installation, we have been able to charge all of our equipment from the leisure battery and have removed our reliance on mains electricity and the fees that come alongside it.
Installing a 1500w Inverter in a Motorhome
Before we installed our inverter, we had to consider what we would be using the equipment for? This involves thinking about the amount of current you will be pulling from your battery, which had a direct effect on the size of the inverter that we would require. We then thought about the amount of energy storage that was currently in the van and whether this would be enough to last us a few days, and we then decided on whether an additional leisure battery would be required.
After all of this, we planned the circuit layout and design, as well as what other pieces of equipment we would require, such as a circuit breaker.
What Inverter Did We Install?
Based on the premise that we would be solely using the inverter to charge batteries for cameras, laptops, and phones, as well as the odd use of our air purifier fan, we decided that 1500 watts of power would be ample. We then thought about the different types of inverters on offer, between modified and pure sine wave inverters.
Given that neither of us are electrical engineers, our understanding of the difference between the two ended at “modified – okay, pure – better”, and so we went for the pure sine wave option.
We chose to install the Novapal 1500w Pure Sine Wave Inverter and began the install.
What Battery Did We Install?
The motorhome came with one 100Ah AGM leisure battery when we bought her, the same as our set up in Roxy the Hiace in Australia. We decided that this would not be enough and so we double this capacity by purchasing another 100Ah AGM leisure battery.
The important thing we had to remember here was that if we were to install another battery, it would have to be done in parallel with the original, and it would have to be the same size and type as the original.
We went for the Platinum AGM Plus 100Ah battery and began the install.
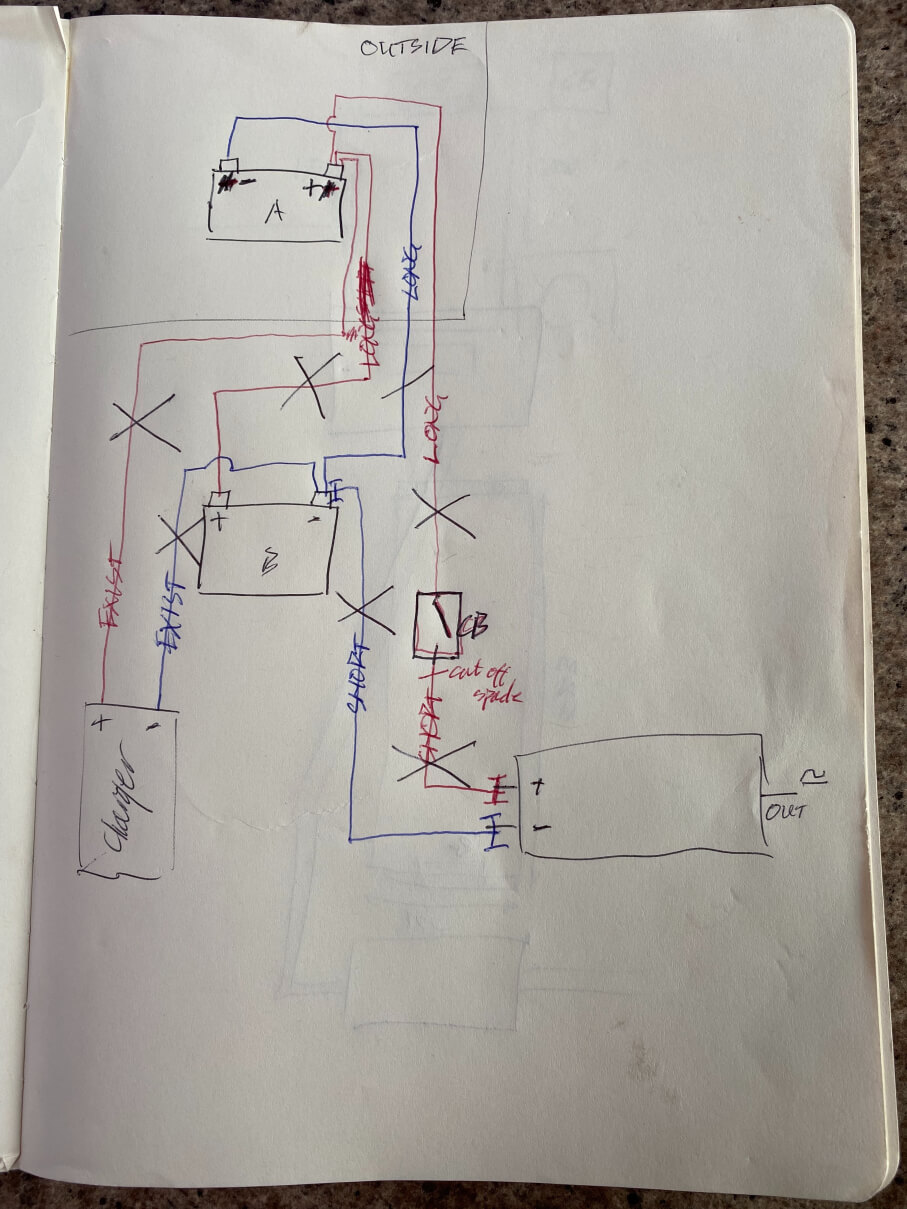
Diagram of Installation
Results of Installation
The result of the installation was a fully functioning 230v circuit that could last for over a week at moderate use of charging cameras, laptops, and phones. We are very happy with the capacity of the system now and do not plan on making any further modifications to the number of batteries involved.
We did, however, soon after realise that there is no charger linking the vehicle battery to the leisure battery, so the leisure system does not charge up unless on the mains supply. This is a different project, but our plans are to install a split charge relay, a solar charging system, as well as purchase a backup generator to run on days where neither of the above are doing the job.
Stay tuned for more updates!